Invite Team members
In this article
- Add User
- Access Type
- Step 1 : Invite / Add User
- Step 2 : Assign Tester/Developer to any project
- User is Already Registered in another account within QA Touch tool
- How to View Assigned Projects in Administration User list
- How to Regenerate Password Link in Administration Users
- How to Set Temporary Password in Administration Users
- How to Export Users
- How to Import User(s)
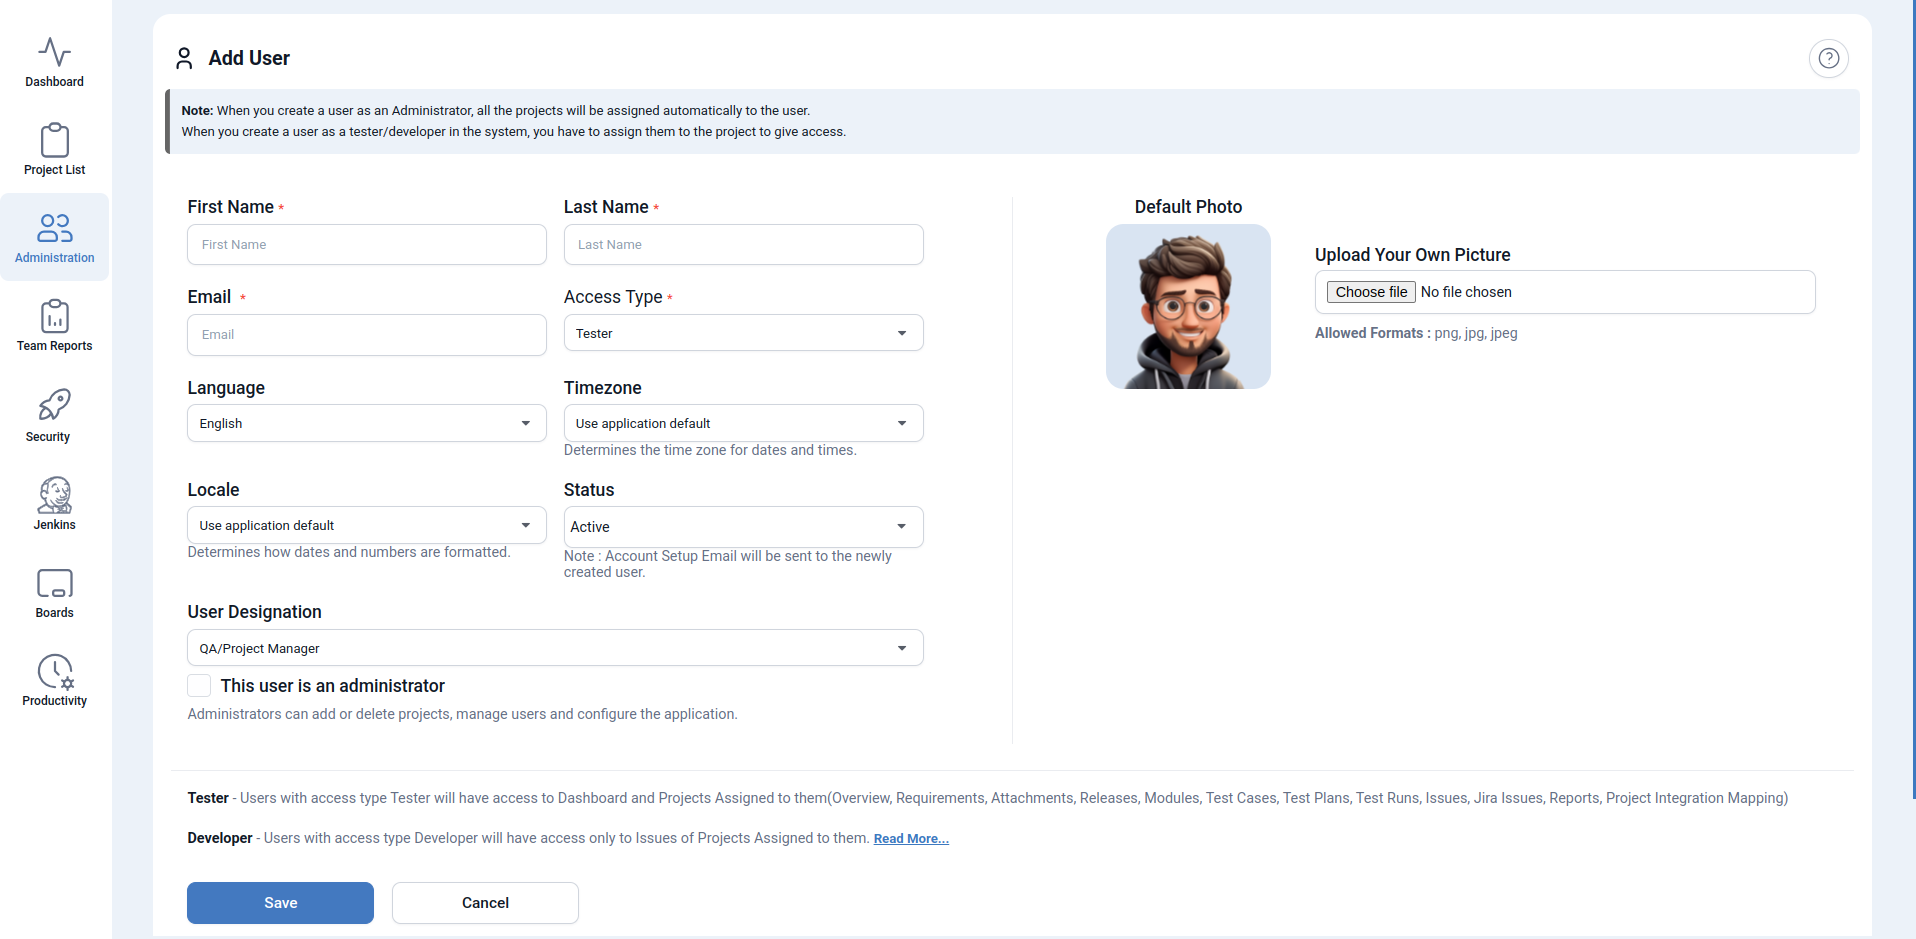
Add User
Invite your team members in just a few clicks and start collaborating on test cases, test runs, and issue tracking together.
The Administration panel in QA Touch provides a centralized hub to oversee your workspace members
We are displaying Total Users / Active Users / Inactive User information Total User / Active Users Real-time counters showing your current seat utilization.
Admins, Testers, and Developers User Type
By clicking the ”+ Add User” button, administrators can invite new members, assign their specific roles, and set their designations
Access Type
Tester - Users with access type Tester will have access to Dashboard and Projects Assigned to them(Overview, Requirements, Attachments, Releases, Modules, Test Cases, Test Plans, Test Runs, Issues, Jira Issues, Reports, Project Integration Mapping)
Developer - Users with access type Developer will have access only to Issues of Projects Assigned to them. Each user role in QA Touch defines their level of access within a project. Here’s a quick breakdown:
Admin: Full access across the application.
Tester: Can create, execute, and manage test cases.
Developer: Limited access, typically can only view or manage issues.
Custom Role: Configured by admins with specific permissions (e.g., view-only, edit-only).
When you create a user as an Administrator, all the projects will be assigned automatically to the user.
When you create a user as a tester/developer in the system, you have to assign them to the project to give access.
Step 1 : Invite / Add User
- Goto Administration->Users Management
- Click on Add User button
- Enter the User details(Firstname, Lastname, Email)
- Choose whether This user is an administrator or not
- Click Save (Note: After User Creation the Registered Email will get an Email for Password Setup)
| Fields | Option |
|---|---|
| First Name | Manadatory |
| Last Name | Manadatory |
| Manadatory | |
| Access Type | Tester / Developer |
| Language | English Default |
| Timezone | Determines the time zone for dates and times. |
| Locale | Determines how dates and numbers are formatted. |
| Status | Account Setup Email will be sent to the newly created user. |
| User Designation | Designation |
| This user is an administrator | Administrators can add or delete projects, manage users and configure the application. |
| Upload Your Own Picture | Upload picture with png/jpg format |
After creating a new user successfully, the user will get email notification with password setup. Users can easily generate passwords, login and access the product. When you create a user as a tester/developer in the system, you have to assign them to the project to give access.

Step 2 : Assign Tester/Developer to any project
Steps to Assign Users to a project:
The Assign User functionality streamlines collaboration by allowing you to assign users to specific projects.
On the project details page, locate and click on the “Assign User” option. A popup window will appear with two tabs: “Add Assign User” and “Assigned User.” In the “Add Assign User” tab: Select the appropriate role for the user from the available options. Choose the user you want to assign to the project. Click the “Save” button to confirm and save the user assignment. To ensure the user is assigned successfully, navigate to the “Assigned Users” tab.
Step 2 : User is Already Registered in another account within QA Touch tool
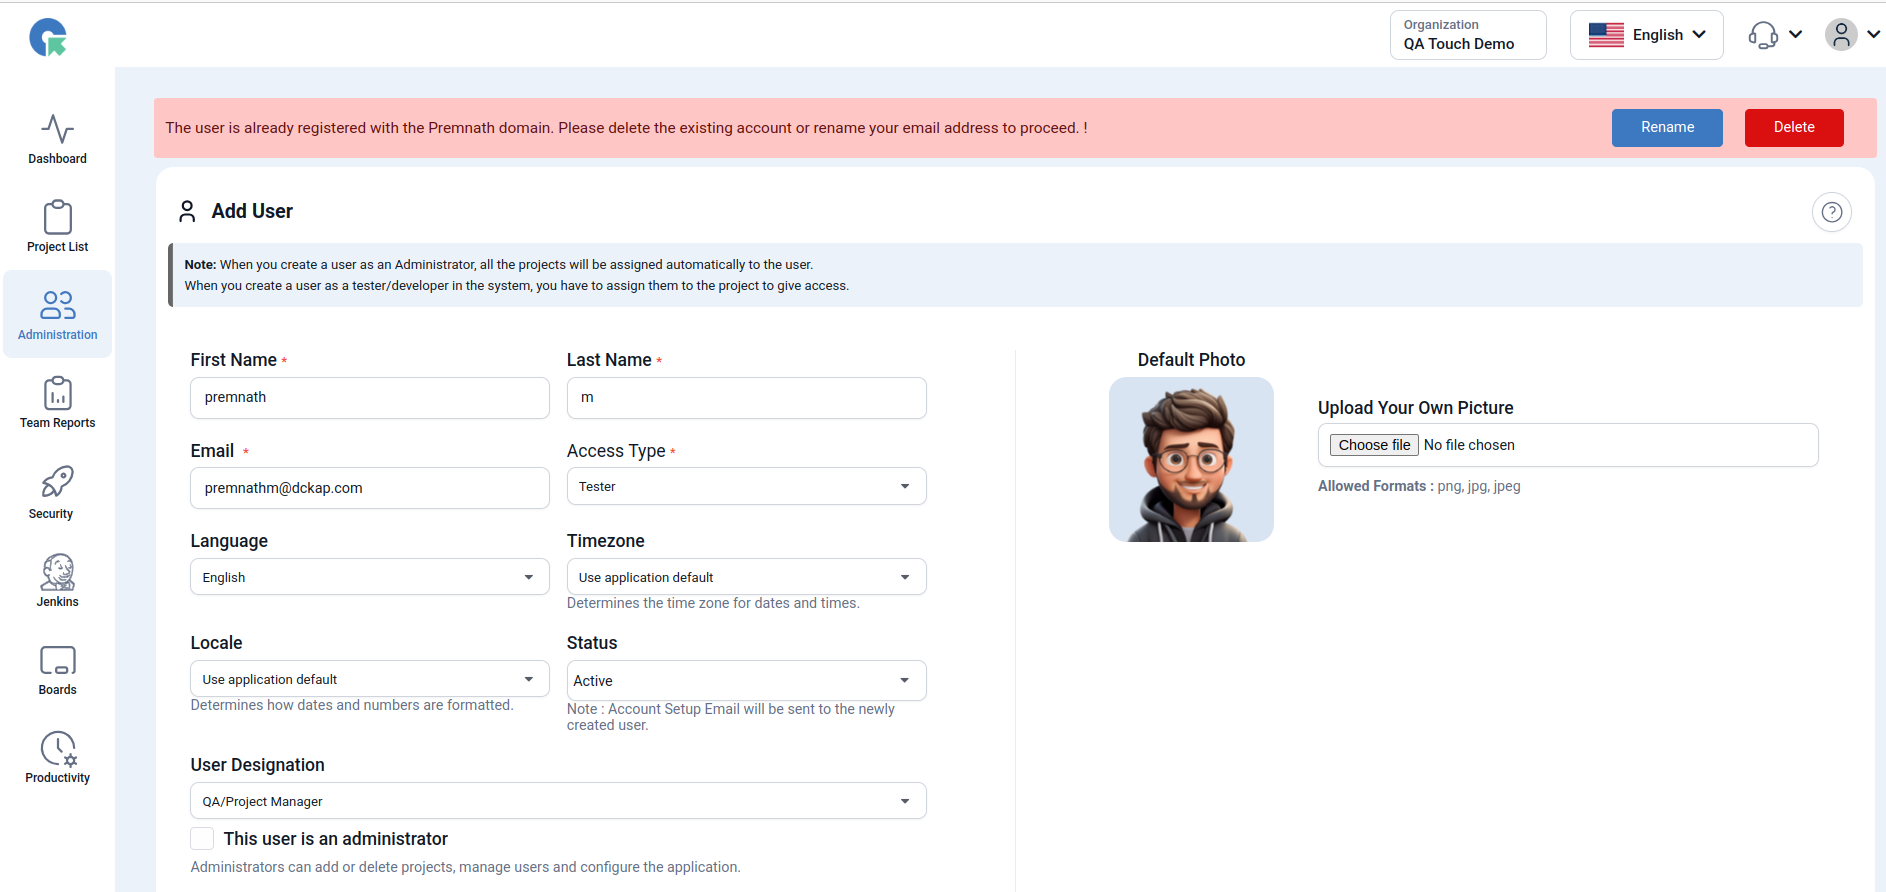
The email domain (e.g., @abc.com) is already registered in another account within the system. Initial people created a sample account in QA Touch explored the product, everything fine they can use as a permanent account. We need to delete the sample account. Email address is unique in QA Touch
The user is already registered with the Premnath domain. Please delete the existing account or rename your email address to proceed. !
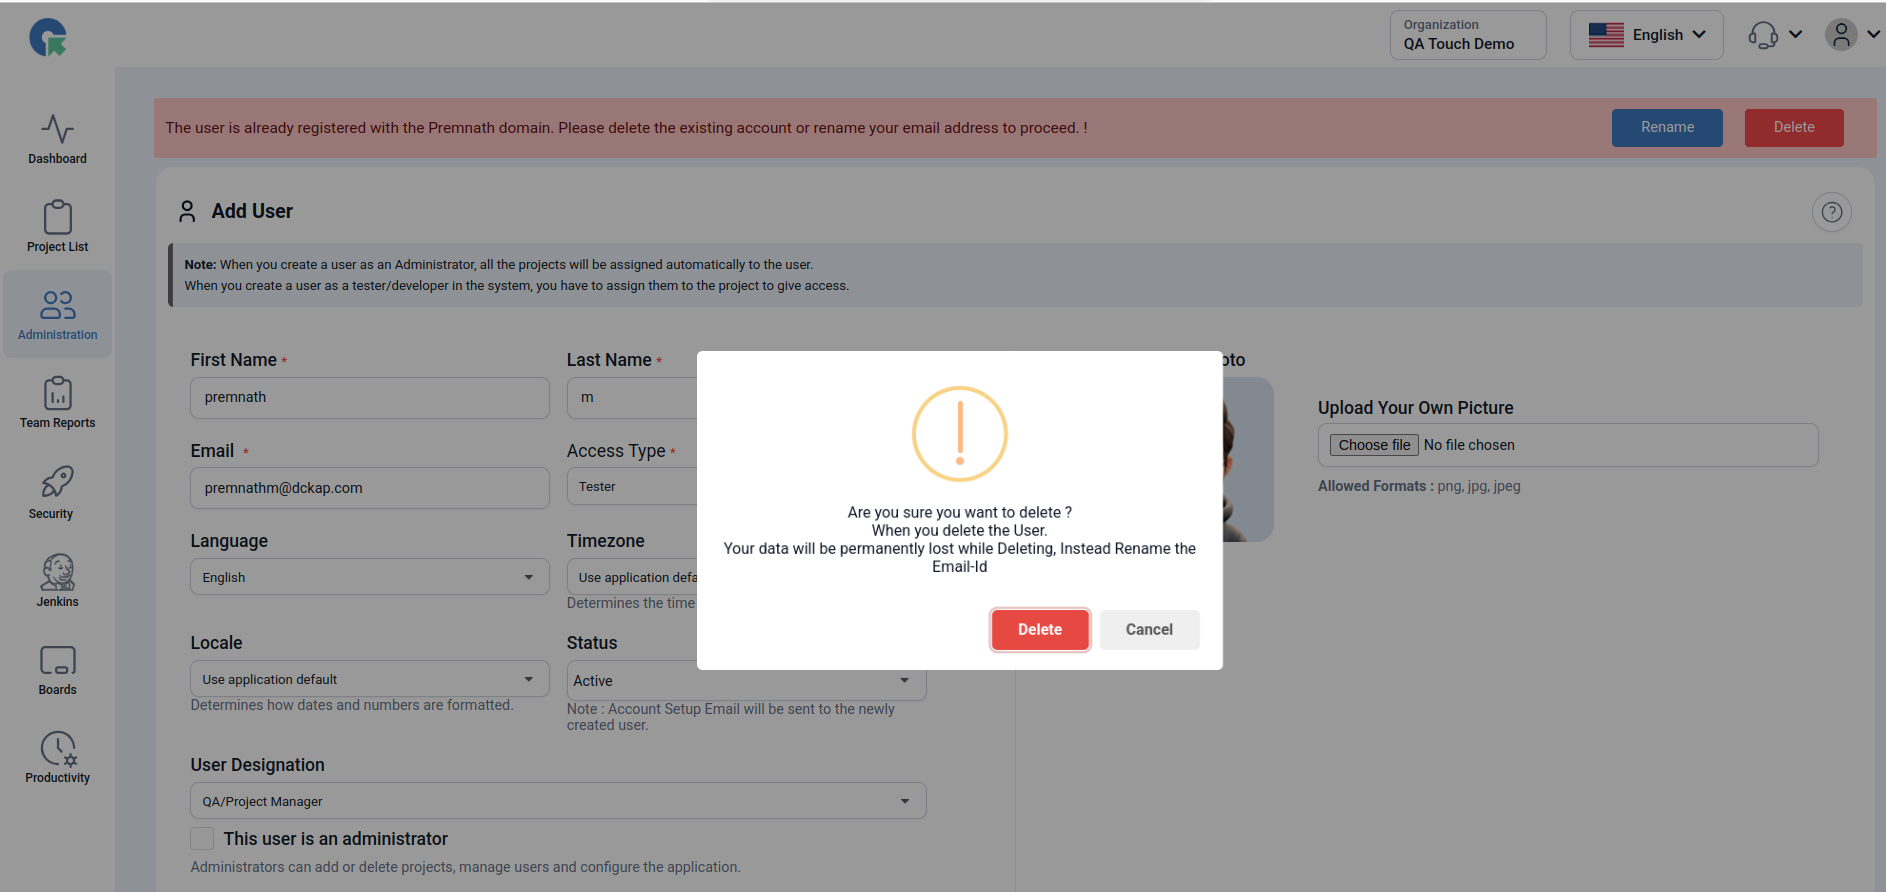
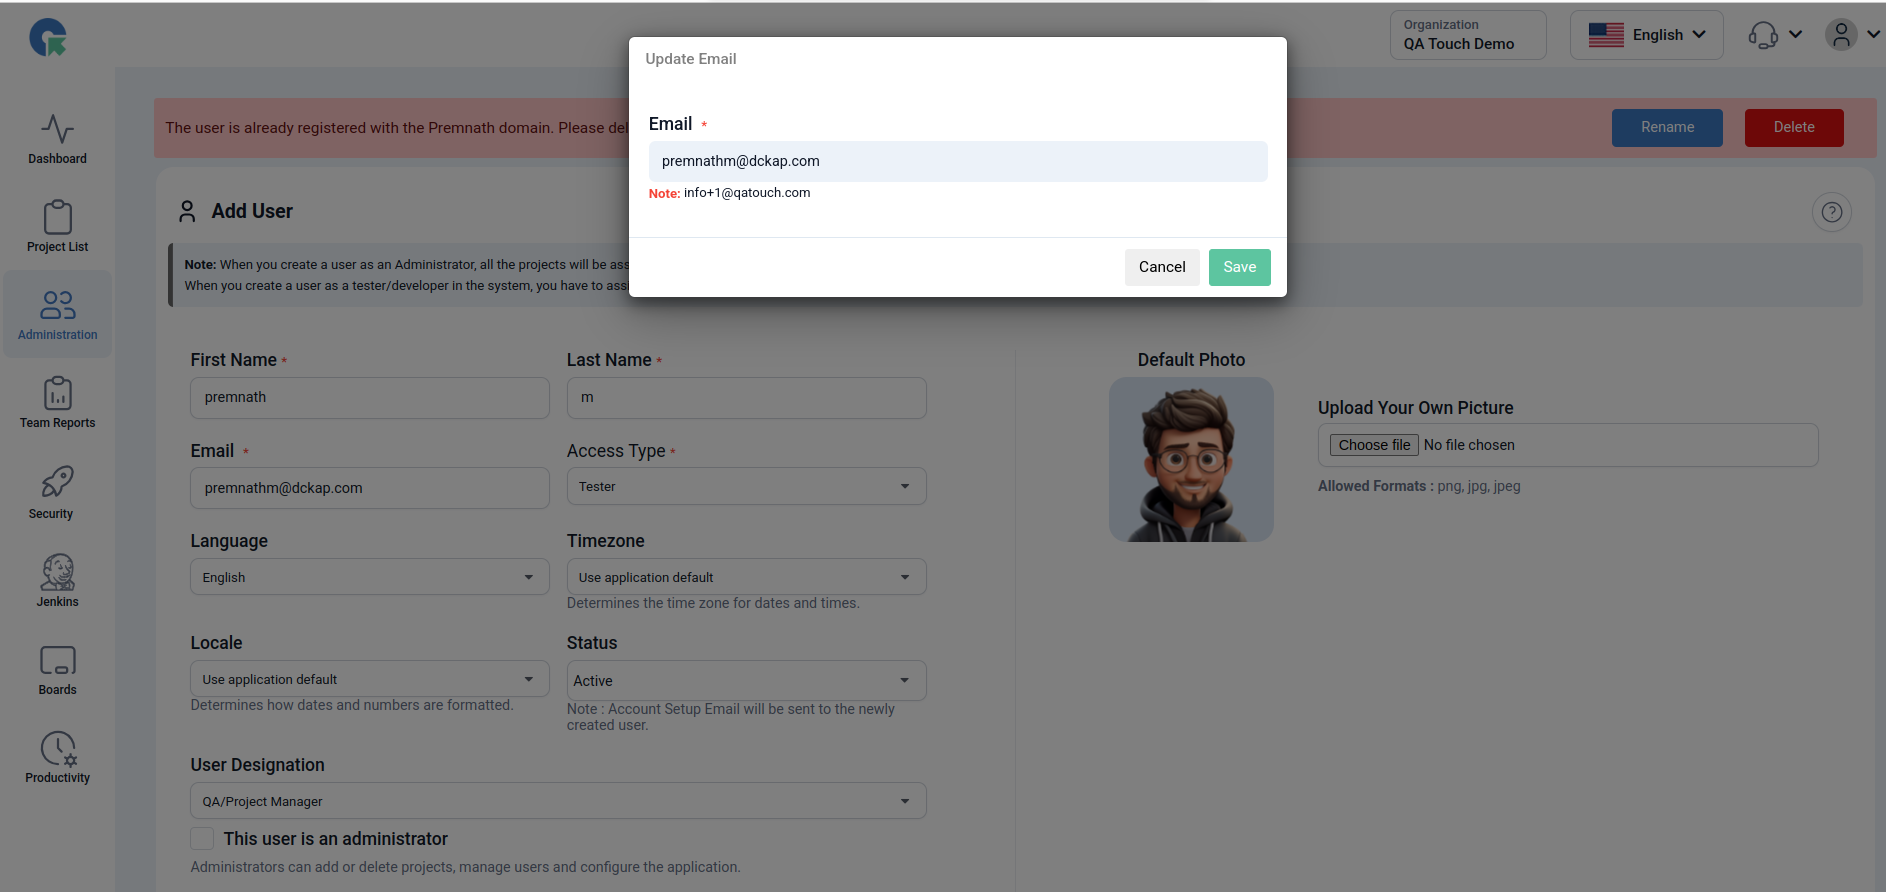
How can I fix this?
We have given 2 option - Rename and Delete
a) Rename - Click the “Rename” button the change email address and click the save button. Invite users once again. b) Delete - Delete the sample account, Invite users once again.
Edit User / Edit Profile
Edit Profile - Users can easily update their profile details by editing their name, email address, and profile photo. Simply navigate to the profile settings, make the necessary changes, and save to keep your information up to date.
a) Generate API Key For QA Touch Authentication
Go to User -> Edit profile Under General settings, Click ‘Generate API Key’ to generate the API key. API requests to QA Touch must be authenticated. To authenticate, include the following in your request headers:
domain – Your QA Touch domain api-token - Your QA Touch API token
These credentials carry the access permissions for the entire data in your QA Touch, so keep them safe and never expose them in public repositories. All API calls must be made over HTTPS. Requests made without proper authentication or using HTTP will fail.
b) Notification Setting - Email Notification
Enable/ Disable Issue Notification Option to Enable/Disable email notification for Issue(s) and Issue comment(s) assigned to you On - Triggers Email notification for Issue(s) and Issue comment(s) assigned to you Off - Disables Email notifications Option to Enable/Disable email notification for Test run(s) assigned to you On - Triggers Email notification for Test run(s) assigned to you Off - Disables Email notifications
c) Preferences
User can change the theme Dark / Light Mode Default Pagination setup
Edit User
Admin easily update their profile details by editing their name, email address and changing the status (Active / InActive). Employee leave from organization, Admin deactivate the account status as InActive status
Select the avatar you want to use, the selected avatar will now appear alongside the comments section in the Classic Issue module

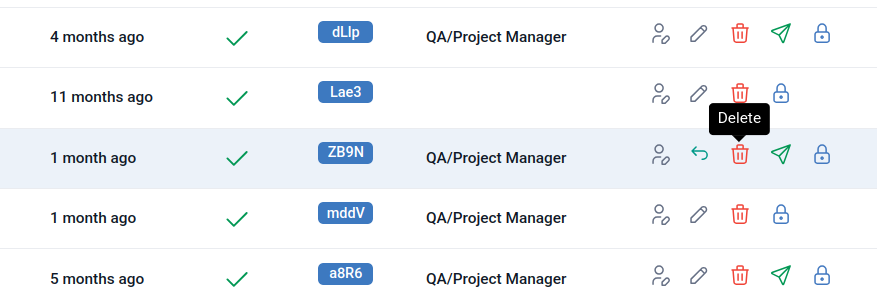
Delete user (Deactivate)
- Go to User Management page
- Click on Delete icon near the user needs to be deactivated
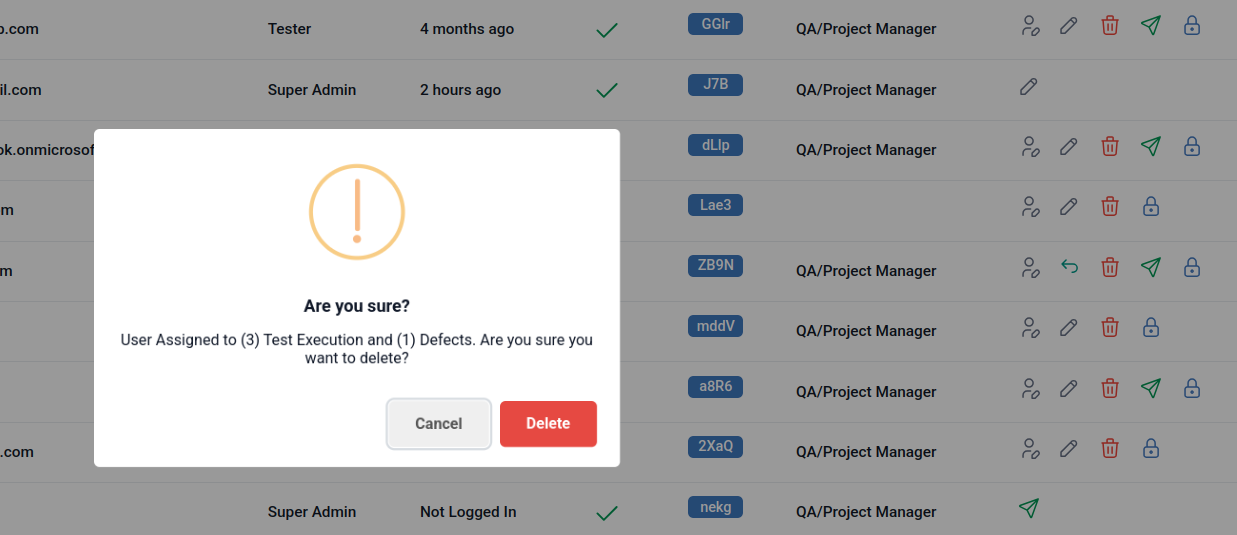
- Confirm delete in popup, Now the user will be De activated Not Assigned any items it will be delete permanently
Users Assigned to (0) Test Execution and (0) Defects. Will be permanently deleted not deactivated.
Assigned any items it will be delete Deactivated User
Users Assigned to (0) Test Execution and (6) Defects. Will be permanently deleted not deactivated.
Permanent Delete Deactivated User
- Go to User Management page
- Select Deactivated Users from the dropdown
- All Deactivated users will be listed here
- To delete permanently click on delete icon
To Revert / Activate a Deactivated User
- Go to User Management page
- Select Deactivated Users from the dropdown
- All Deactivated users will be listed here
- Click on revert back icon and confirm
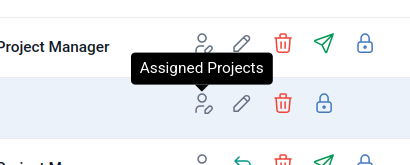
How to View Assigned Projects in Administration User list
To view the assigned project for a particular user click on Assigned user icon ,all the project will be shown To Unassign the user from the project click on Remove access button ,the user will be unassigned from the project successfully.
- Click on assign user user button and goto Assigned user tab
- All the assigned users will be listed
- To unassign user the from the project click the Remove access button
- The user will be unassigned from the project successfully.

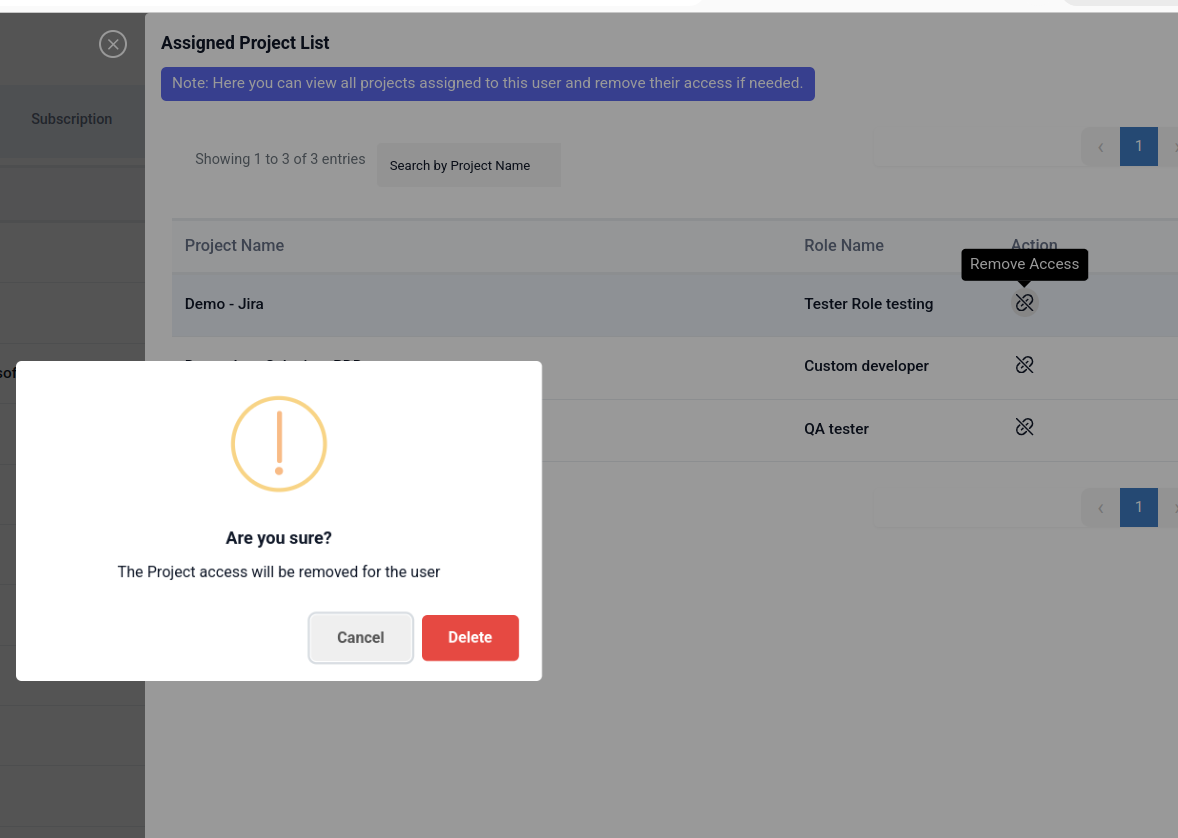
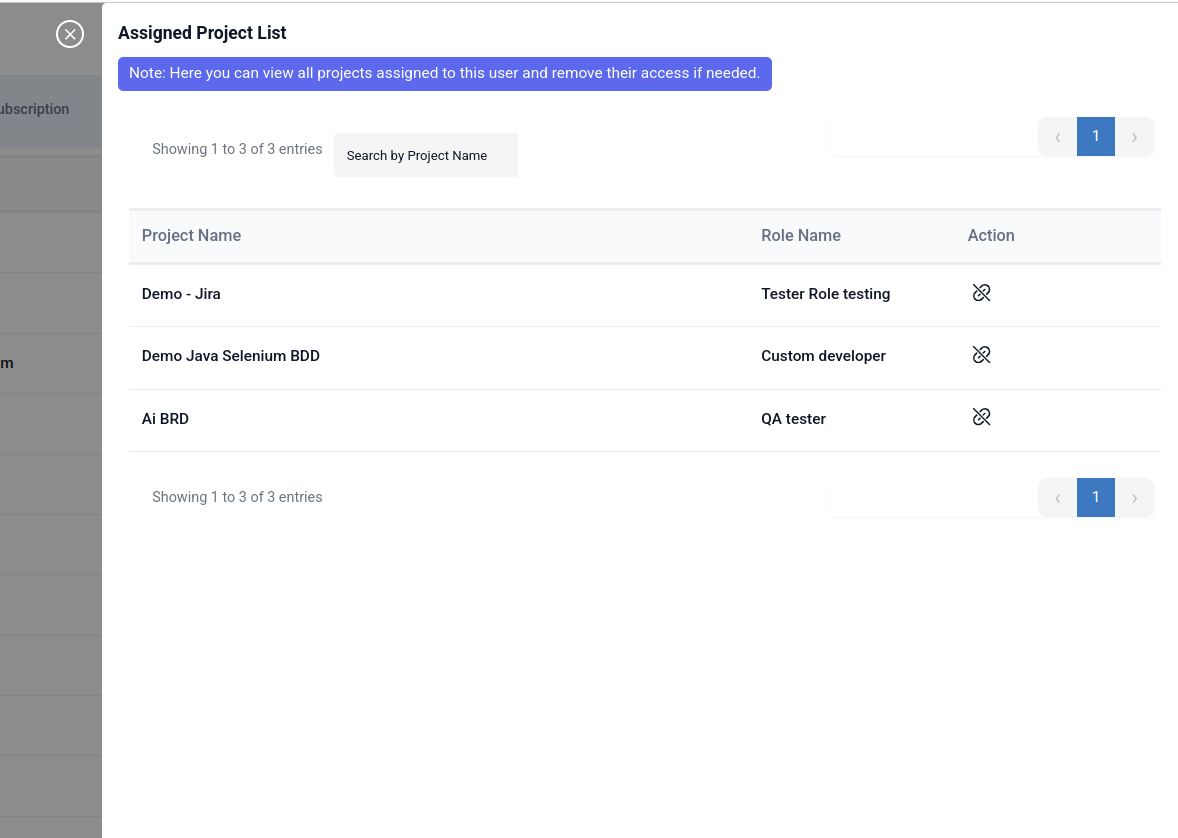
Action - Unlink option to remove access from the project
How to Regenerate Password Link in Administration Users
Regenerating a password link for administration users involves navigating to the user management section, selecting the user, and triggering a “Reset Password” action to generate a new, secure URL.

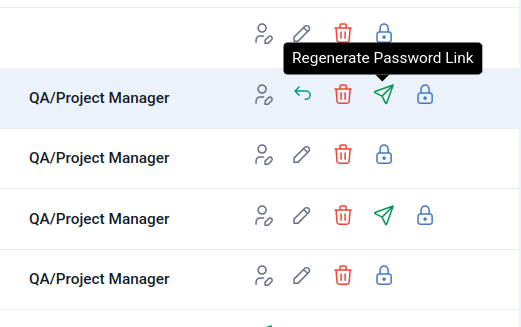
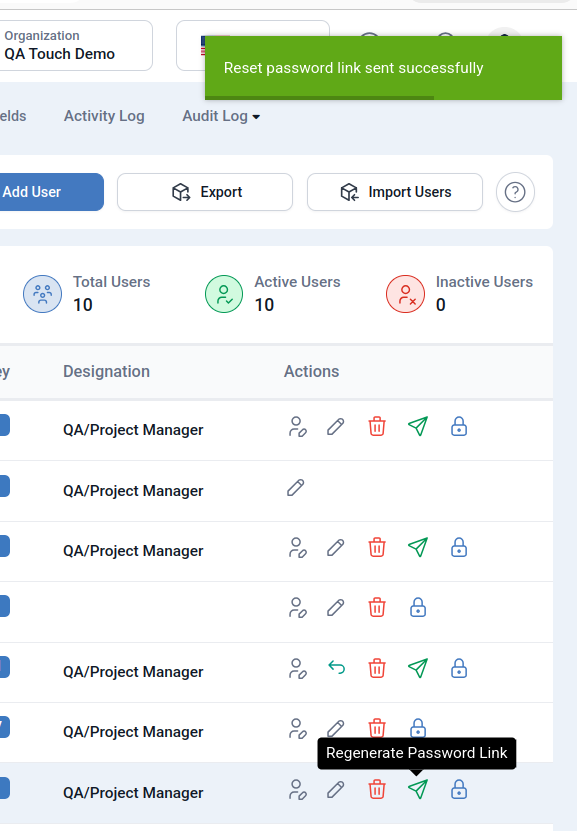
Reset password link send it to corresponding users.
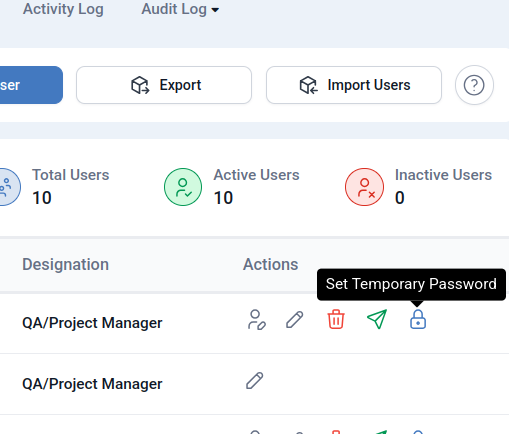
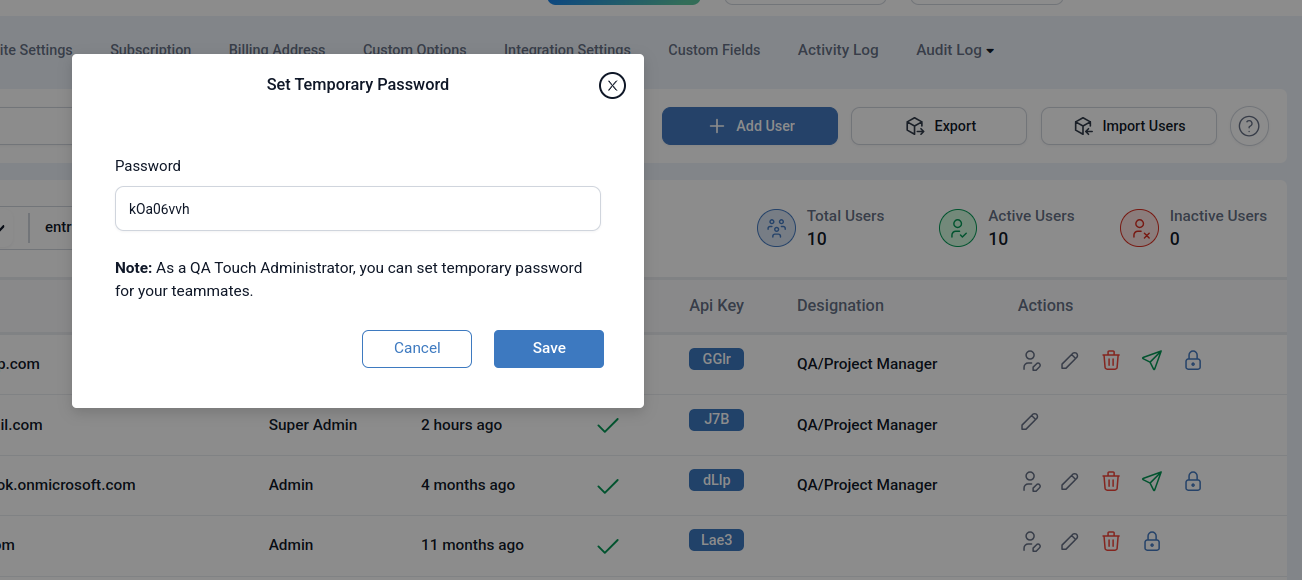
How to Set Temporary Password in Administration Users
QA Touch Administrators can set temporary passwords for teammates to help them access their accounts quickly and securely. This ensures smooth onboarding and allows users to reset their credentials after first login.
Go to Administration -> User Management Click on the Set Temporary Password icon. Enter the password and click save.
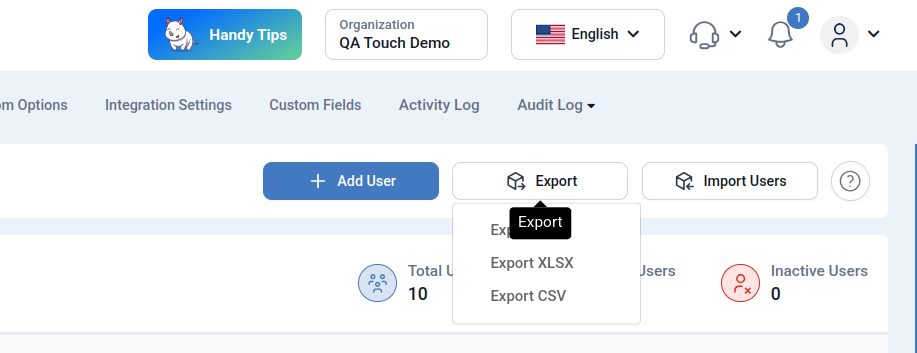
How to Export Users
- Go to Administration -> User Management
- Click the Export text button.
- Click on any format in the Export dropdown. (XLS , XLSX, CSV)
How to Import User(s)
Please download the Google Doc user sample and proceed with the import. Click here to download the sample.
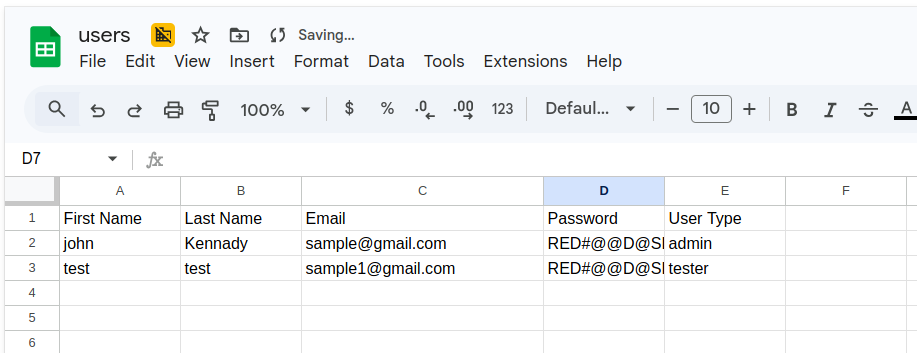
QA Touch provides you a sample User Import file, Download in desired format CSV/XLS/XLSX and modify the data as per your requirement and upload it
Details on Columns and Values:
Firstname and Last name - Should contain alphabets, space. Special Character not allowed. Email - should be a valid Email address. Password - sample password. User type - tester/developer/admin.
Note: DO NOT CHANGE THE COLUMN NAMES/HEADERS
Note on User Type and their accessibilities Tester - Users with access type Tester will have access to Dashboard and Projects Assigned to them(Overview, Requirements, Attachments, Releases, Modules, Test Cases, Test Plans, Test Runs, Issues, Jira Issues, Reports, Project Integration Mapping)
Developer - Users with access type Developer will have access only to Issues of Projects Assigned to them.
Admin - User with access type Tester and Admin access(Marked as “This user is an administrator”) will have access to All Projects, Dashboard, Managerial reports, and Administration options(Users Management, Roles Management, Site Settings, Subscription, Billing Address, Custom Options, Integration Settings, Custom Fields, Activity Log).