Test Cases Import
In this article
QA Touch offers effortless options for users to migrate their data from other test management tools (Test Rail, Practices, Testmo, TestLink open source, etc.) into the QA Touch platform. Additionally, the QA Touch team provides support for data migration. It is important to note that QA Touch offers a Test Case data option only.
Import Test Case to QA Touch
Download the Sample Test Cases Templates from the QA Touch Import page Fill out the Test Case information on the Sample File Now upload, Map the required fields, and click on “Import” All test cases will be added to QA Touch
What are Test Case Templates available in QA Touch for Import?
There are three types of test case templates available in QA Touch for Import.
- Test Case (Text)
- Test Case (Steps)
- Test Case (Custom Fields)
What are the four types of data migration?
QA Touch support four types of data migration:
CSV XLS XLSX XML
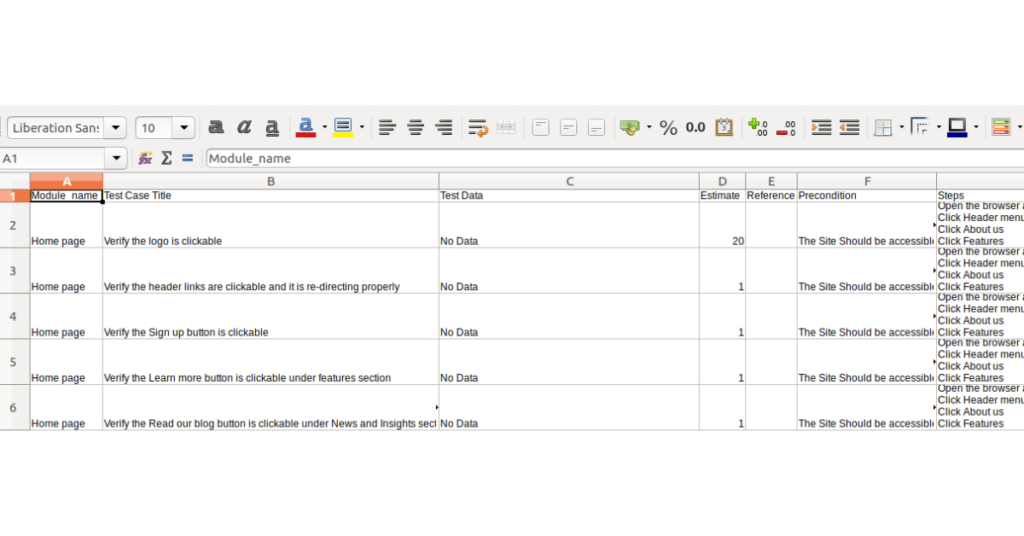
Import Test Cases (CSV/XLS/XLSX – Format)
-
Goto Test case List page and navigate to the import page by clicking on Import
-
Choose the Test case Template ( Test Case (Text) / Test Case (Steps) / Test Case (Custom field))
-
Upload the file(CSV, XLS, XLSX) to import
-
Map the fields in your file with QA Touch Test case fields. Module name and Test case title are mandatory.
-
Click on the Import button

Rules for CSV/XLS/XLSX Format file
- Excel file can only have a single sheet
- The first row should have the headers. Ex: Module Name, Test case title
- During the mapping of fields, it is imperative to ensure that all required fields are accurately mapped with the corresponding columns of the Excel sheet and that they are not left blank. (Module name and Test case title are mandatory.)
- It is possible to leave all other test case fields as options while importing, and they can either be left without mapping or have blank data.
Template
Test Case ( Text ): Write the test case in a single detailed flow without step separation. Test Case ( Steps ): Define the test case with structured steps and expected results for each action. Test Case (Custom Fields): Create and use your own fields to tailor test cases to your project needs.
QATouch Supported Format (Expected):
- Module and test case name field is mandatory in the tool.
- All field values of a test case should be on a single cell.
- Merged rows are not accepted.
- Test name field won’t allow duplicate values.
| Fields | Option | Explanation |
|---|---|---|
| Module Name | Mandatory | Specifies the module or feature of the application where the test case belongs. You can import test cases with hierarchies using a CSV file. Use the greater-than symbol (>) in the first column to separate levels. Example: Module > Sub Module 1 > Sub Module 2 |
| Test Case Title | Mandatory | A short and clear title that describes the purpose of the test case. It should summarize what the test case is validating. |
| Test Data | Optional | Data required to execute the test case, such as input values, credentials, or sample datasets used during testing. |
| Estimate | Optional | The estimated time required to execute the test case. This helps in planning and managing test execution effort. |
| Reference | Optional | Links or References to related documents such as requirements documents,user stories and defeats ID’s |
| Preconditions | Optional | Conditions that must be satisfied before executing the test case |
| Steps | Optional | Detailed step-by-step instructions describing how to perform the test case. |
| Expected Results | Optional | The expected outcome after executing the test steps. It defines the correct system behavior. |
| Test suite | Optional | A collection or group where the test case is organized for easier test management and execution. |
| Tags | Optional | Labels used to categorize and filter test cases (e.g., regression, smoke, UI). |
| Description | Optional | Additional information explaining the objective or context of the test case. |
| Type | Optional | Defines the category of the test case, such as Functional, Regression, Smoke, or Integration. |
| Priority | Optional | Indicates the importance of the test case execution, usually classified as High, Medium, or Low. |
| Mode | Optional | Specifies whether the test case is executed manually or through automation. |
| Created By | Optional | Displays the name of the user who created the test case for tracking and ownership purposes. If created by name not specified, the system will automatically map the person who is importing the cases |
1) How to add a submodule in a CSV file?
You can also import the test cases with hierarchies from a CSV file. Simply, use the greater-than symbol (>) in the first column as a separator.
Example : Module > Sub Module 1 > Sub Module 2
2) How to import test case steps?
You can import the test case steps simply by separating each step and expected result by a newline in your CSV
Example :
Steps Expected Results
- Open the browser and enter the URL 1. The site should be accessible.
- Click the Header menu 2. The header menu should open.
- Click About us 3. The menu About Us link should be redirected to the About Us page.
- Click Features 4. The menu Features link should be redirected to the Features page.
Import Test Cases – Queue Enable/Disable For Importing Test Cases QA Touch has the option to Queue the process of Import Test cases. Enabling Queue for importing more than 500 Test cases will run the import in the background without affecting your regular work and takes lesser time and bandwidth to import the data.
Follow the steps to Queue Enable/Disable For Importing Test Cases
- Go to Administration -> Site Settings
- Enable the option “Queue Enable/Disable For Importing Test Cases” Read more >>>
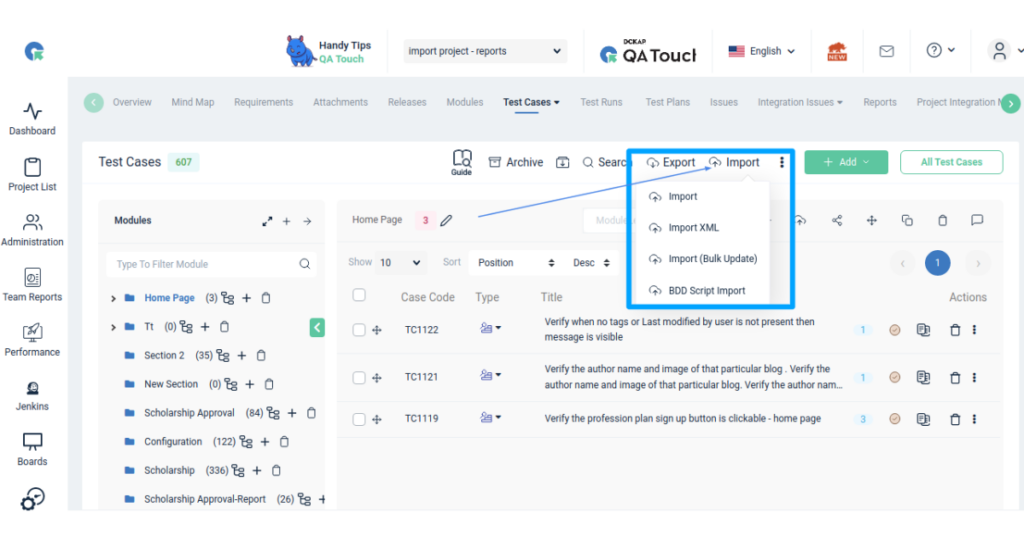
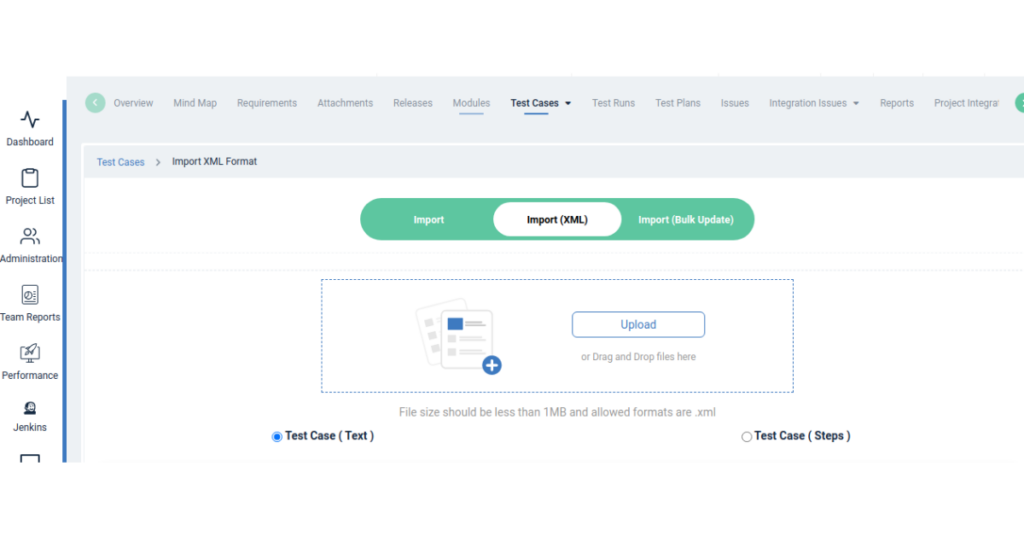
How to Import Test Cases in XML format?
We are providing a sample XML file with keywords that can be used to import test cases.
-
Goto Test case List page and navigate to the “Import XML” menu
-
Choose the Test case Template ( Test Case (Text) / Test Case (Steps) )
-
Fill out the Test Case script in the Sample XML file
-
Upload the file XML to import
-
Click on the Import button
XML Script
Exploratory Template :
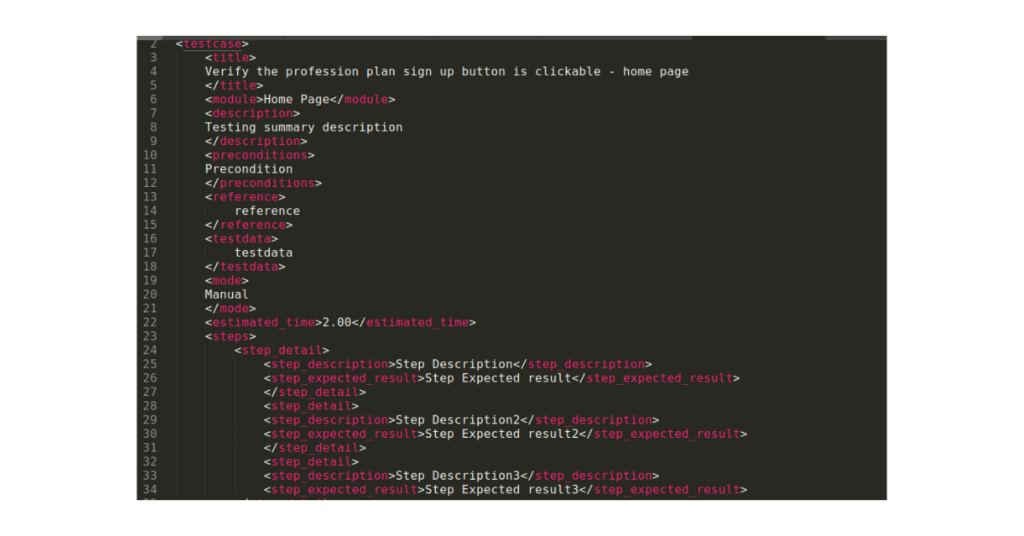
    <testcase> *Mandatory

    <title> *Mandatory

        Verify the profession plan sign-up button is clickable – home page 2

    </title>

    <module>Home Page > Footer</module> *Mandatory

    <description>

        Testing summary description

    </description>

    <preconditions>

        Precondition

    </preconditions>

    <reference>

        reference

    </reference>

    <testdata>

        testdata

    </testdata>

    <mode>

        Manual

    </mode>

    <estimated_time>2.00</estimated_time>

    </testcase>

    To Import Test cases with steps

    Follow the same syntax as above and a <Steps> Tag and enclose all your step(s) details within

    <steps>

        <step_detail>

                <step_description> Step Description – 1 </step_description>

                <step_expected_result> Step Expected result – 1

                </step_expected_result>

        </step_detail>

        <step_detail>

                <step_description> Step Description – 2 </step_description>

                <step_expected_result> Step Expected result – 2

                </step_expected_result>

        </step_detail>

    </steps>