Project Management
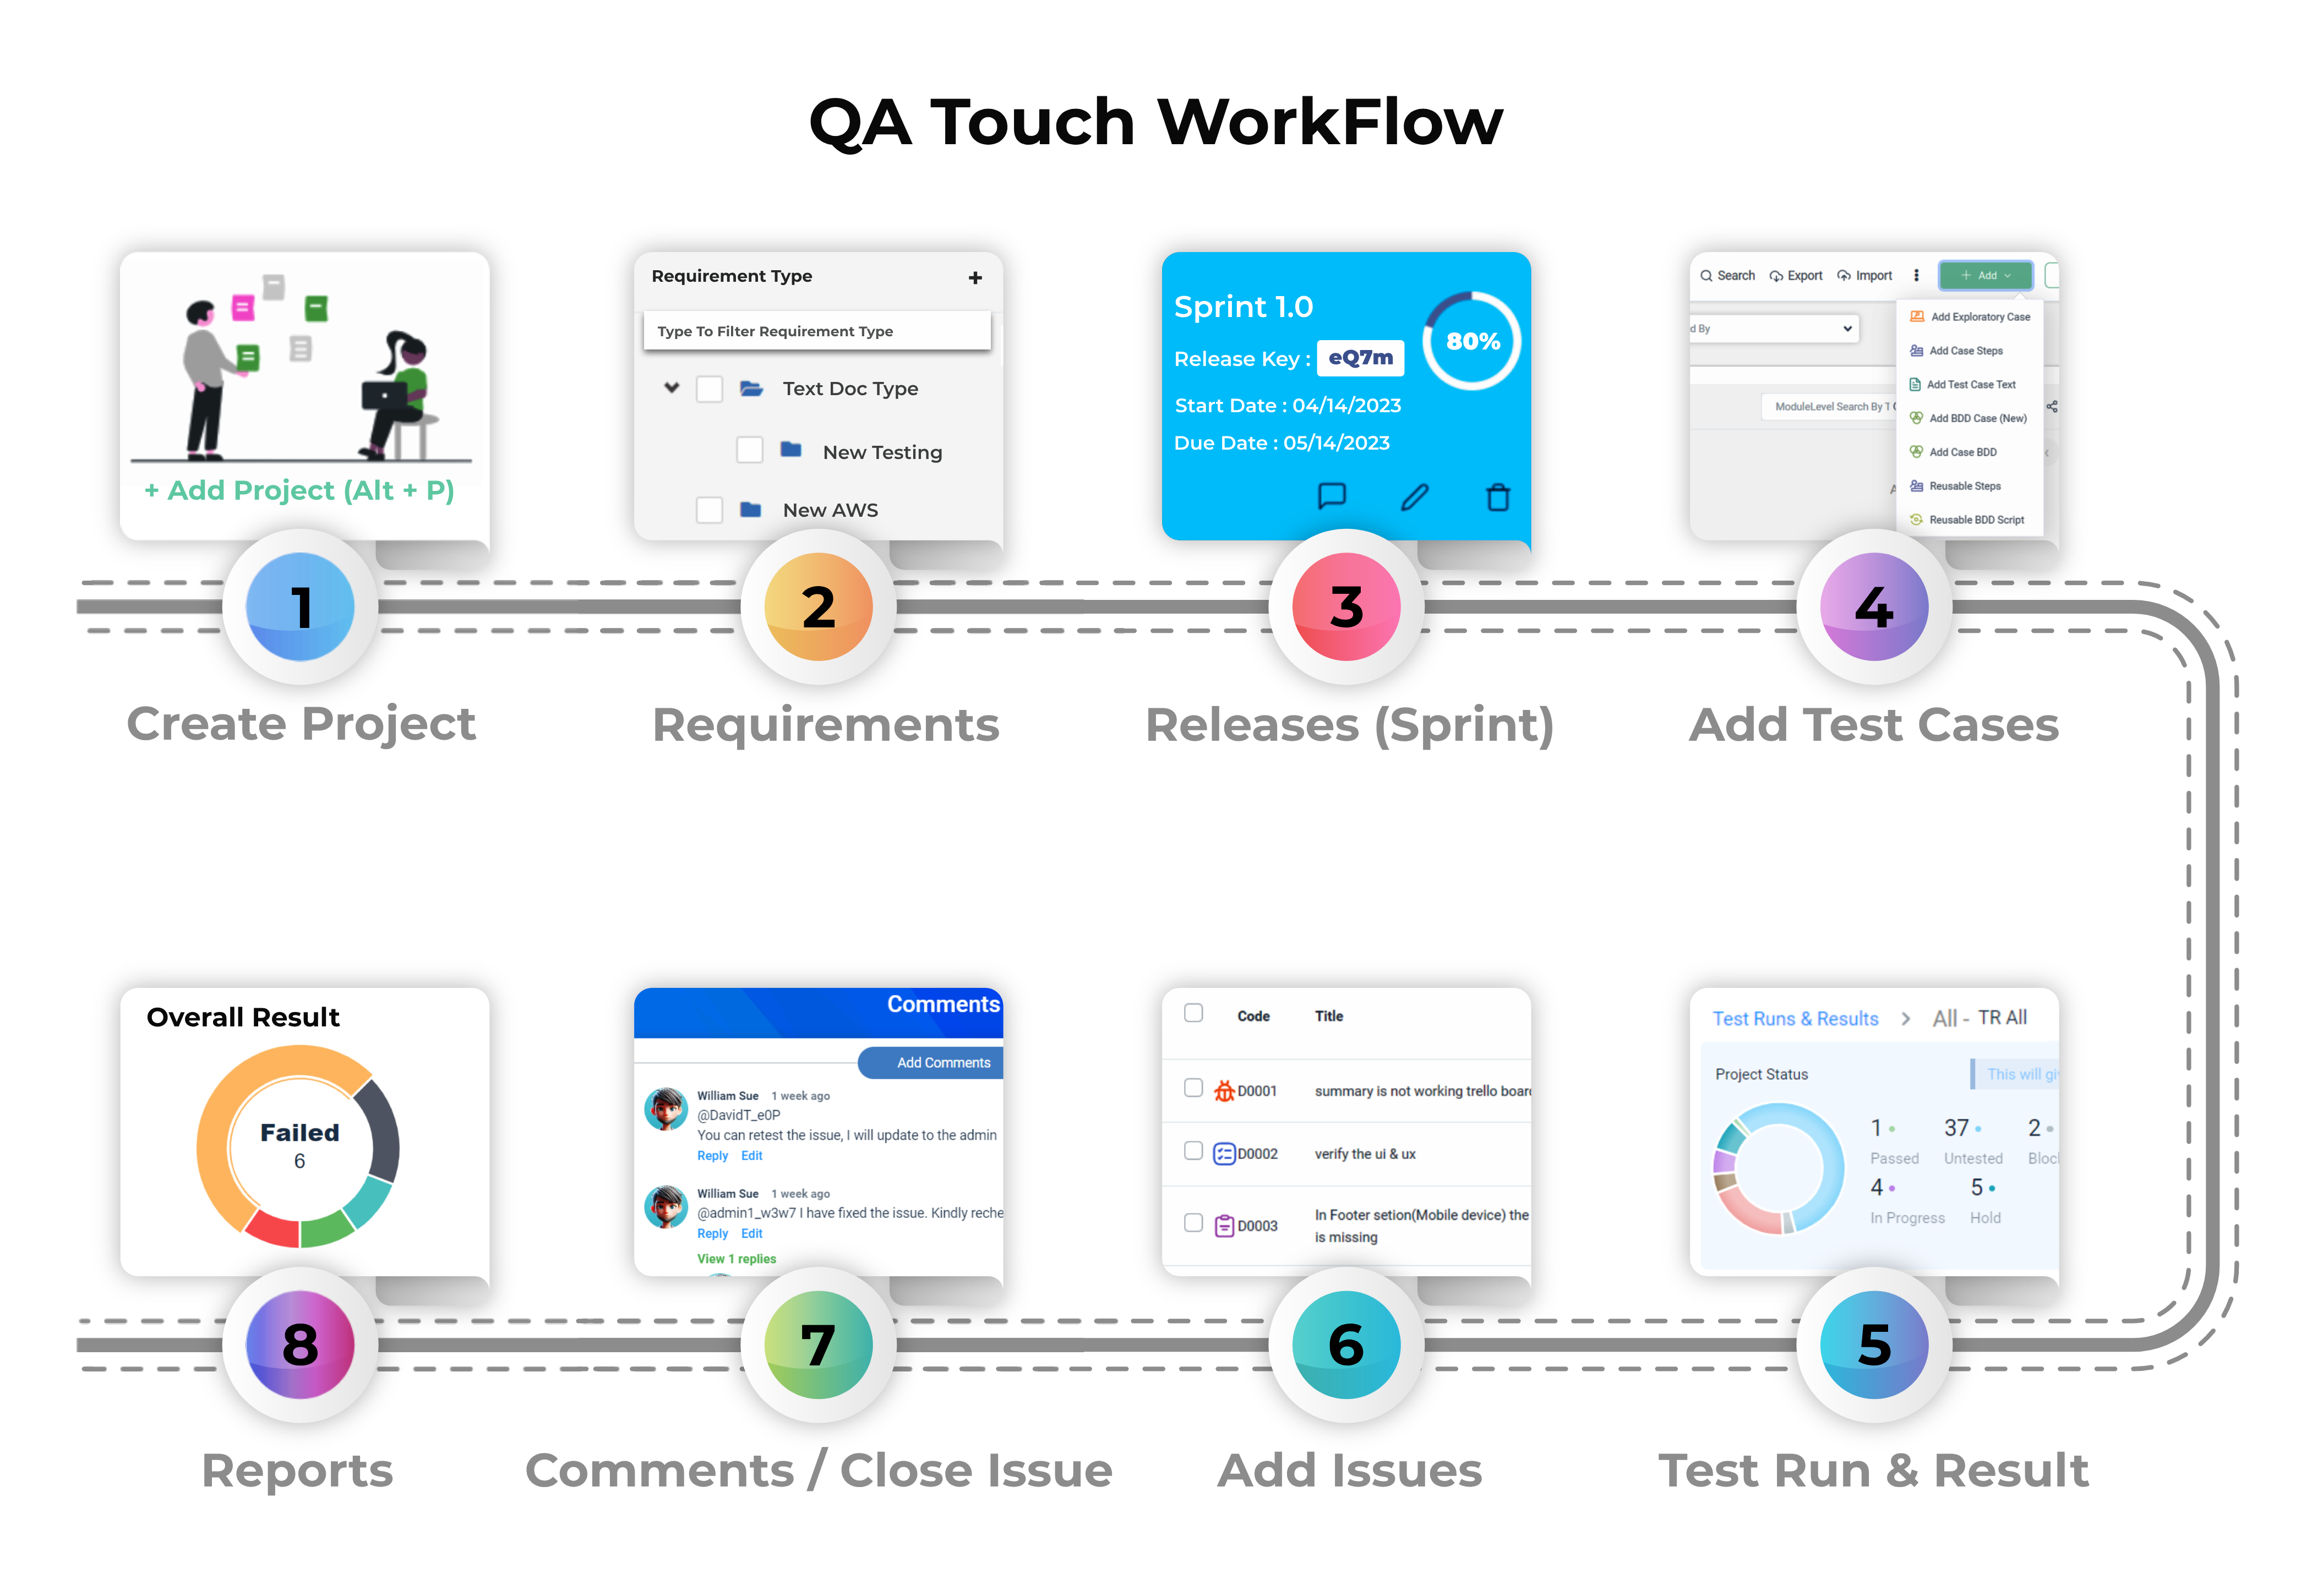
QA Touch Workflow
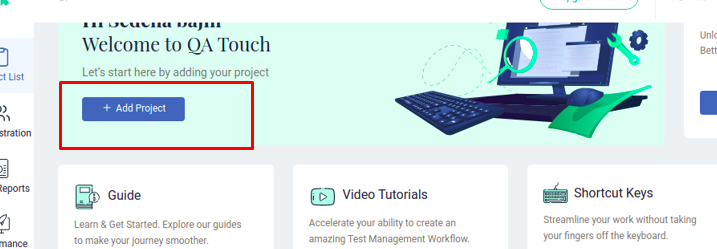
How to Create, Edit, and Delete a Project in QA Touch?

How to Create, Edit, and Delete a Project in QA Touch?
- Login to your QA Touch account.
- After logging in, you’ll be directed to the Projects page.
- Select the “Add Project” button.
- Fill out essential details like:
- Choosing your workspace
- Entering project name
- Finally, click on save.
- Click Submit to save your project.
Once created, the project becomes available in your main project list and is ready to house your test cases and sprints.
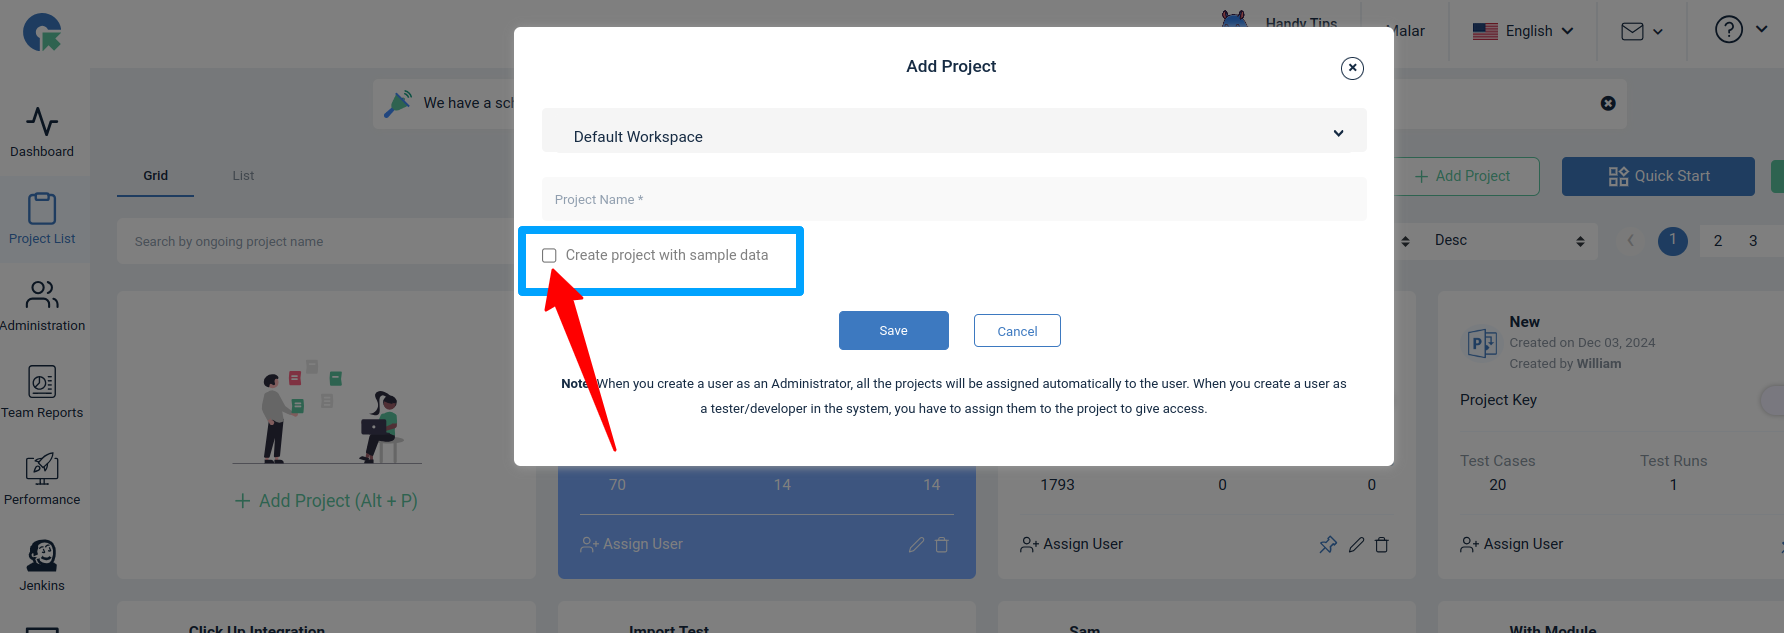
How to Create a Project with Sample Data?
- Log in to your account.
- Go to the Projects section from the main menu.
- Click the “Create Project” button.
- Enter Project Name
- Look for the option to Create project with Sample Data (usually a checkbox )
- Verify the entered details.
- Click “Save” or “Create” to finalize the project.
Understanding Project status?
Each project in QA Touch can be assigned a status, allowing better lifecycle tracking and team filtering:
Ongoing – Currently being worked on. Completed – Fully executed, with no further changes expected. Archived – Stored out of view for reference, not active.
Use statuses to organize your dashboard, prioritize work, and filter reports.
How to Assign user to a Project in QA Touch?
The Assign User functionality streamlines collaboration by allowing you to assign users to specific projects.
- On the project details page, locate and click on the “Assign User” option.
- A popup window will appear with two tabs: “Add Assign User” and “Assigned User.”
- In the “Add Assign User” tab:
- Select the appropriate role for the user from the available options.
- Choose the user you want to assign to the project.
- Click the “Save” button to confirm and save the user assignment.
- To ensure the user is assigned successfully, navigate to the “Assigned Users” tab. When you create a user as a tester/developer in the system, you have to assign them to the project to give access.
When you create a user as an Administrator, all the projects will be assigned automatically to the user. When you create a user as a tester/developer in the system, you have to assign them to the project to give access.
Tester - Users with access type Tester will have access to Dashboard and Projects Assigned to them(Overview, Requirements, Attachments, Releases, Modules, Test Cases, Test Plans, Test Runs, Issues, Jira Issues, Reports, Project Integration Mapping)
Developer - Users with access type Developer will have access only to Issues of Projects Assigned to them.
Editing an Existing Project
- From the Projects dashboard, locate the project.
- Click on the Edit icon.
- You’ll be redirected to the project settings page.
- Update any of the following: Project Title Description User Assignments Status (Ongoing, Completed, Archived)
- Visual Customizations (Background color, font color, logo) 6.After making the necessary changes, scroll down and click Update.
What is a pin in QA Touch?
The Pin feature allows you to prioritize and easily access your most important projects. By pinning a project, you ensure it stays at the top of your project list, making it readily identifiable and accessible.
Look for the pin icon next to Assign user.
Select the project you want to prioritize and click on the pin icon next to Assign user. Once clicked, the icon changes its appearance to indicate that the project is now pinned.
Your pinned project will now be prominently displayed at the top of the project list.
How to unpin a Project?
If you need to remove a project from the pinned list, simply click on the pin icon again located next to the project name. The project will be unpinned and will move back to its original position in the project list.
What is Ongoing/Completed/Archived Projects?
Efficiently organize and track the status of your projects with our status management features. Whether your project is ongoing, completed, or archived, you can easily categorize and locate it as needed. Here’s a step-by-step guide on how to use these features: On the project list page, you’ll find a dropdown menu placed before the “Add User” option. Choose from three status options:
Ongoing: Represents projects that are currently in progress.
Completed: Marks projects that have been successfully finished.
Archived: Indicates projects that you want to hide or have deleted.
How to Archiving a Project?
- To archive a project, click on the “Delete” option placed next to “Edit” in the project details.
- A popup window will appear with three options: Archive, Delete, and Cancel.
- Select “Archive,” and the project will be automatically moved to the archived status.
- If you want to view or manage archived projects, go to the dropdown and select “Archived Projects.” Your archived projects will be visible.
How to change Project Status:
- To change the status of a project, click on the “Edit” option placed before “Delete” in the project list page.
- Redirected to the project edit page.
- Locate the “Status” option and choose from the available options: Ongoing, Completed, or Archived.
- Scroll down and click on the “Update” button to save the changes.
- The project will now be moved under selected status. By effectively utilizing these status management features, you can enhance your project management experience and keep your workspace organized.
How to Delete project?
Need to remove an outdated or completed project? QA Touch gives you the option to delete projects permanently.
Open the Projects list.
Locate the project you wish to remove.
- Click the Delete icon next to the project name
- A pop-up window will appear with three options: Archive, Delete, and Cancel.
- Click Delete to permanently remove the project from your workspace.
- Confirm the deletion when prompted.
Deleted projects are permanently removed and cannot be recovered. Archive instead if you think the project might be needed later.
Important Note:
Deleting a project is an irreversible action, and all associated data will be permanently removed. Please make sure you have considered the implications before confirming the deletion.
How to Sorting project?
The Sorting feature helps you to organize your projects based on your prioritization. Whether you prefer viewing projects chronologically by creation date or alphabetically by project name, sorting allows you to tailor your workspace for optimal efficiency. Additionally, you can arrange projects in ascending or descending order, offering flexibility in how you navigate and locate specific projects. Quick Access
Quick Access
You can also access Test Cases, releases,issues,reports,requirements,Test runs,Activity log
- Click on the 3 dots near the project you need to access
- Now in the list of options select which you need to work on.
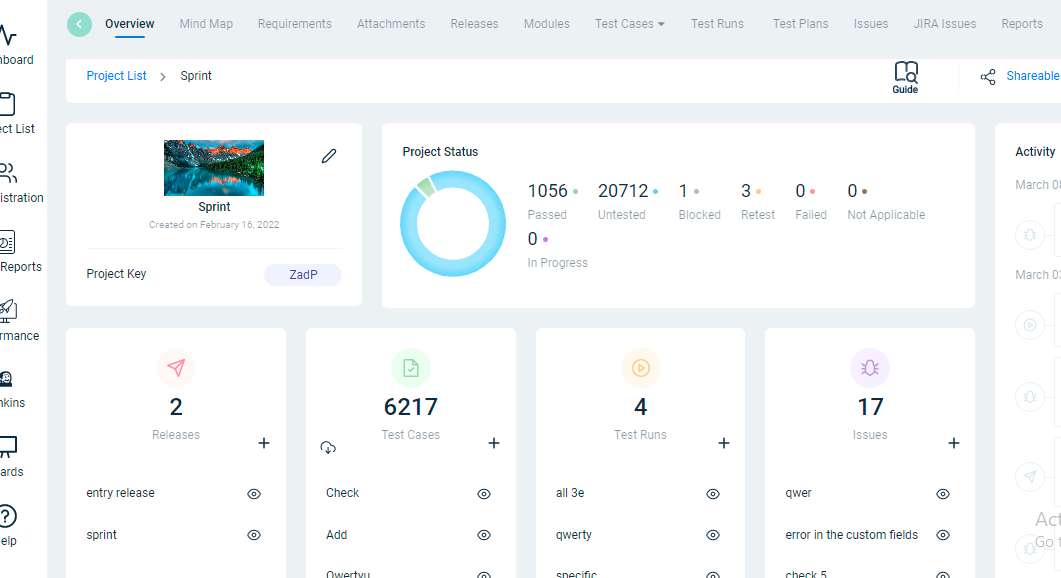
Project Overview
- In Project overview page you can see the details of the project selected.
- We also have Easy access to Testcase,release, Testrun and issues pages.
- You can import testcase file from overview page itself.
- You can also see the Project status with a pie chart displayed.